Recovering from an ankle sprains
All it takes is a simple miss step, and suddenly you have a sprained ankle. An ankle sprain is one of the most common musculoskeletal injuries in people of all ages, athletes and couch potatoes alike. The injury occurs when one or more of the ligaments in the ankle are stretched or torn, causing pain, swelling, and difficulty walking. Many people try to tough out ankle injuries and don’t seek medical attention. But if an ankle sprain causes more than slight pain and swelling, it’s important to see a clinician. Without proper treatment and rehabilitation, a severely injured ankle may not heal well and could lose its range of motion and stability, resulting in recurrent sprains and more downtime in the future.
Appointments SMS 08641576335 email david@theosteopath.net
Anatomy of an ankle sprain
The most common type of ankle sprain is an inversion injury, or lateral ankle sprain. The foot rolls inward, damaging the ligaments of the outer ankle — the anterior talofibular ligament, the calcaneofibular ligament, and the posterior talofibular ligament. (Ligaments are bands of fibrous tissue that connect bone to bone; see illustration.)
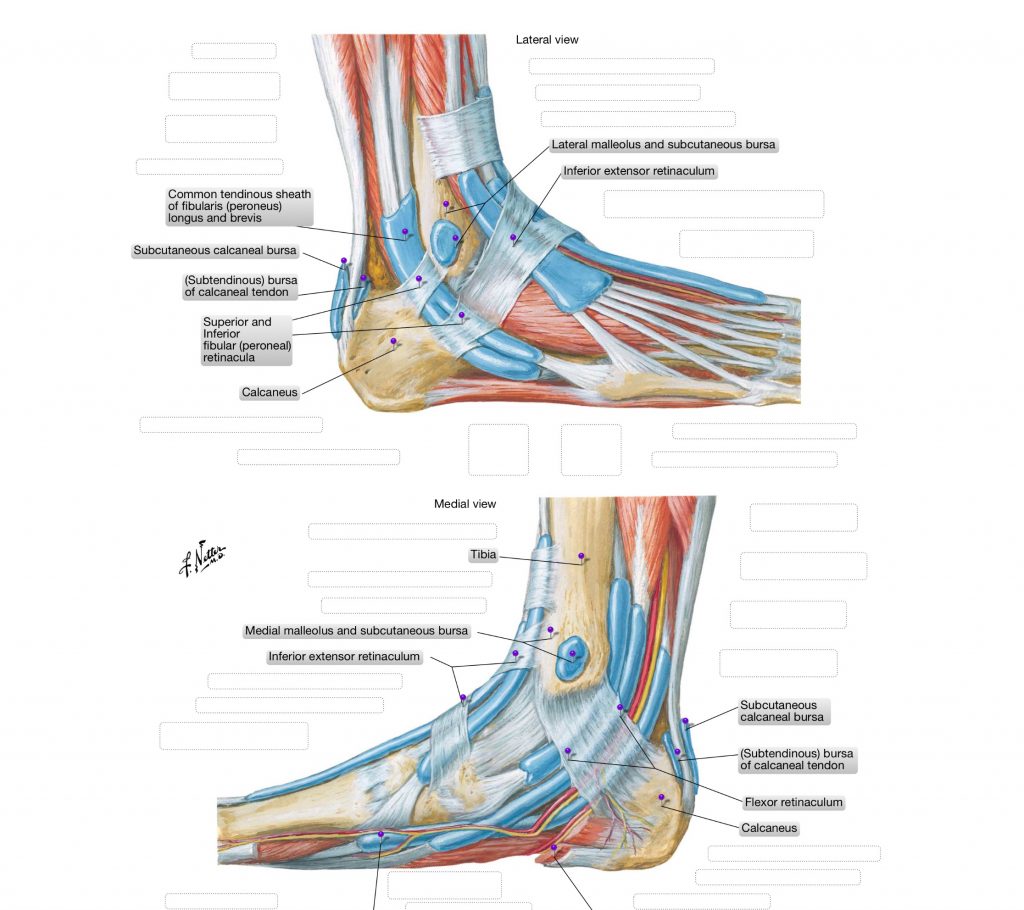
| Ankle ligaments |
Less common are sprains affecting the ligaments of the inner ankle (medial ankle sprains) and syndesmotic sprains, which injure the tibiofibular ligaments — the ligaments that join the two leg bones (the tibia and the fibula) just above the ankle. Syndesmotic sprains, which occur most often in contact sports, are especially likely to cause chronic ankle instability and subsequent sprains.
The severity of an ankle sprain depends on how much damage it does and how unstable the joint becomes as a result. The more severe the sprain, the longer the recovery
There are three grades of ankle sprain dependent upon severity
Grade 1 – Mild pain, swelling, tenderness. Often no bruising or instability and no weight bearing difficulty. Recovery time up to 3 weeks
Grade 2 – Moderate pain, swelling, and tenderness. Possible bruising. Mild to moderate joint instability. Some loss of range of motion and function. Pain with weight bearing and walking. Recovery time up to 6 weeks
Grade 3 – Severe pain, swelling, tenderness, and bruising. Considerable instability and loss of function and range of motion. Unable to bear weight or walk. Recovery time may be months.
Immediate ankle sprain treatment
The first goal is to decrease pain and swelling and protect the ligaments from further injury. This usually means adopting the classic RICE regimen — rest, ice, compression, and elevation. If you have severe pain and swelling, rest your ankle as much as possible for the first 24–48 hours. During that time, immerse your foot and ankle in cold water, or apply an ice pack (be sure to cover the ankle with a towel to protect the skin) for 15–20 minutes three to five times a day, or until the swelling starts to subside.
To reduce swelling, compress the ankle with an elasticated bandage, or ankle sleeve. When seated, elevate your ankle as high as you comfortably can — to the height of your hip, if possible. In the first 24 hours, avoid anything that might increase swelling, such as hot showers, hot packs, or heat rubs. Nonsteroidal anti-inflammatory drugs such as ibuprofen can help reduce pain and swelling and may also speed recovery. One tip is to place a rolled towel under the end of the mattress. This helps remove the build up of inflammatory by products.
Ankle sprain medical evaluation
Unless your symptoms are mild or improving soon after the injury, contact your doctor. He or she may want to see you immediately if your pain and swelling are severe, or if the ankle feels numb or won’t bear weight. He or she will examine the ankle and foot and may manipulate them in various ways to determine the type of sprain and the extent of injury. This examination may be delayed for a few days until swelling and pain improve; in the meantime, continue with the RICE regimen.
X-rays aren’t routinely used to evaluate ankle injuries. Ligament problems are the source of most ankle pain, and ligaments don’t show up on regular x-rays. To screen for fracture, clinicians use a set of rules — called the Ottawa ankle rules, after the Canadian team that developed them — to identify areas of the foot where pain, tenderness, and inability to bear weight suggest a fracture. A review of studies involving more than 15,000 patients concluded that the Ottawa rules identified patients with ankle fractures more than 95% of the time.
Ankle sprain functional treatment
To recover from an ankle sprain fully, you’ll need to restore the normal range of motion to your ankle joint and strengthen its ligaments and supporting muscles. Studies have shown that people return to their normal activities sooner when their treatment emphasizes restoring ankle function — often with the aid of splints, braces, taping, or elastic bandages — rather than immobilization (such as use of a plaster cast). Called functional treatment, this strategy usually involves three phases: the RICE regimen in the first 24 hours to reduce pain, swelling, and risk of further injury; range-of-motion and strengthening exercises within 48–72 hours; and training to improve endurance and balance once recovery is well under way.
Generally, you can begin range-of-motion and stretching exercises within the first 48 hours, and should continue until you’re as free of pain as you were before your sprain. Start to exercise seated on a chair or on the floor. As your sprained ankle improves, you can progress to standing exercises. If your symptoms aren’t better in two to four weeks, you may need to see a physical therapist or other specialist.
| Exercises to help restore function and prevent injuryRange-of-motion, stretching, and strengthening: First 1–2 weeks |
Flexes. Rest the heel of the injured foot on the floor. Pull your toes and foot toward your body as far as possible. Release. Then point them away from the body as far as possible. Release. Repeat as often as possible in the first week. |
| Ankle alphabet. With the heel on the floor, write all the capital letters of the alphabet with your big toe, making the letters as large as you can. |
| Press down, pull back. Loop an elasticized band or tubing around the foot, holding it gently taut (A). Press your toes away and down. Hold for a few seconds. Repeat 30 times. Tie one end of the band to a table or chair leg (B). Loop the other end around your foot. Slowly pull the foot toward you. Hold for a few seconds. Repeat 30 times. |
| Ankle eversion. Seated on the floor, with an elasticized band or tubing tied around the injured foot and anchored around your uninjured foot, slowly turn the injured foot outward. Repeat 30 times. |
| Ankle inversion. Seated on the floor, cross your legs with your injured foot underneath. With an elasticized band or tubing around the injured foot and anchored around your uninjured foot, slowly turn the injured foot inward. Repeat 30 times. |
| Stretching and strengthening: Weeks 3–4 |
| Standing stretch. Stand one arm’s length from the wall. Place the injured foot behind the other foot, toes facing forward. Keep your heels down and the back knee straight. Slowly bend the front knee until you feel the calf stretch in the back leg. Hold for 15–20 seconds. Repeat 3–5 times. |
| Seated stretch. Loop an elasticized band or tubing around the ball of the foot. Keeping the knee straight, slowly pull back on the band until you feel the upper calf stretch. Hold for 15 seconds. Repeat 15–20 times. |
| Rises. Stand facing a wall with your hands on the wall for balance. Rise up on your toes. Hold for 1 second, then lower yourself slowly to the starting position. Repeat 20–30 times. As you become stronger, do this exercise keeping your weight on just the injured side as you lower yourself down. |
| Stretches. Stand with your toes and the ball of the affected foot on a book or the edge of a stair. Your heel should be off the ground. Use a wall, chair, or rail for balance. Hold your other foot off the ground behind you, with knee slightly bent. Slowly lower the heel. Hold the position for 1 second. Return to the starting position. Repeat up to 15 times, several times a day. This exercise can place a lot of stress on the ankle, so get your clinician’s go-ahead before trying it. |